Showing posts with label Microsoft Office Access 2007. Show all posts

Modify a Form

Leave a Comment
Modify a Form
After you create a form, it opens in Layout view, where you can modify it.
To change the size of a field:


1.   Click a side of the field and drag to change the width of the field.
2.   Click the top or bottom of a field and drag to change the height of a field.
To move a datasheet:


1.   Click the datasheet to select it.
2.   Click and drag the four-sided arrow in the upper-right corner to move the datasheet.

To resize a datasheet:


1.   Click the datasheet to select it.
2.   Click a side of the datasheet and drag to change the width.
3.   Click the top or bottom of the datasheet and drag to change the height.

To apply an Auto Format:


The Auto Format option on the Format tab enables you to apply formats quickly, such as background colors, field colors, field label colors, and fonts.

1.   Activate the Format tab.
2.   Click Auto Format. The Auto Format menu appears.
3.   Click the format you want to apply.

To change a form title:


When you create a form, by default, Access uses the form name as the title. You can change the title.

1.   Activate the Format tab.
2.   Click the Title button.
3.   Type the new title.
Read More

Create a Multiple Items Form

Leave a Comment
Create a Multiple Items Form
You can use the Multiple Items button on the Forms tab to create a form that displays multiple records, one record per row.
To create a multiple items form:
1.   Open the Navigation pane.
2.   Click the table or query on which you want to base your form.
3.   Activate the Create tab.
       4.   Click Multiple Items in the Forms group. Access creates a multiple items form.

To change the view:
1.   Open the form.
2.   Activate the Format tab.
3.   Click the down-arrow under the View button. A menu appears.
        4.   Click the view you want.


Read More

Create a Split Form

Leave a Comment
Create a Split Form
A split form is a form in which the same data is displayed in two views simultaneously. One part of the form displays in Form view (stacked fields), while the other part displays in Datasheet view. The two views are synchronized, so as you select a field in one view, it is automatically selected in the other view. You can add, change, or delete the data in either view. Using a split form gives you the benefits of two types of forms in a single form. For example, you can use the datasheet portion to locate records and the form portion to edit records.
To create a split form:
        1.   Open the Navigation pane.
2.   Click the table or query on which you want to base your form.
3.   Activate the Create tab.
          4.   Click Split Form in the Forms group. Access creates a split form.

Read More

Creating Forms

Leave a Comment
Creating Forms
Access forms are much like paper forms: you can use them to enter, edit, or display data. They are based on tables. When using a form, you can choose the format, the arrangement, and which fields you want to display. This lesson teaches you how to create forms.
Using the Form Button
Access can automatically create several types of forms. For example, when you click the Form button on the Create tab, Access places all fields in the selected table on a form. If the table has a one-to-many relationship with one other table or query, Access creates a stacked form (the records are displayed in a column) for the primary table and a datasheet for the related table. If there are several tables with a one-to-many relationship, Access does not create the datasheet.
To create a form:

1.   Open the Navigation pane.
2.   Click the table or query on which you want to base your form.
3.   Activate the Create tab.
          4.   Click Form in the Forms group. Access creates a form.


You can use the Navigation bars to move through the records on a form.


1
Go to First Record
2
Go to Previous Record
3
The Current Record
4
Go to Next Record
5
Go to Last Record
6
Create a New (Blank) Record
To save a form:

1.   Click the Save button on the Quick Access toolbar. Access saves the form unless you are saving for the first time. If you are saving for the first time, the Save As dialog box appears.
2.   Type the name you want to give the form.
3.   Click OK. Access saves the form. You can now access the form by using the Navigation pane.

You can also save by right-clicking a form’s tab and then selecting Save from the menu that appears. Access saves the form unless you are saving for the first time. If you are saving for the first time, the Save As dialog box appears. Type the name you want to give the form and then click OK. Access saves the form. You can now access the form by using the Navigation pane.
Read More

Create a Parameter Query

Leave a Comment
Create a Parameter Query

If instead of entering predetermined criteria, you want to prompt users when a query runs, you can create a parameter query. You create a parameter query by enclosing a question in square brackets ([]). For example, if you want to create a parameter query that asks users which State they want to use from the Student’s table, you would type [Which State?] on the Criteria line under the State column. When the query runs, Access will prompt the user for the answer to your question.
To create a parameter query:

1.   Open a table or query in Query Design view.
2.   Create your query.

3.   On the Criteria line, type the prompt within square brackets.
4.   Click the Run button. Access prompts you.
Read More

Save a Query

Leave a Comment
Save a Query
After you create a query, you can save it. You can rerun a saved query at any time. If you change the data on which the saved query is based, you will see the changes when you rerun the query.
To save a query:
1.   Click the Save button on the Quick Access toolbar


. Access saves the query unless you are saving for the first time. If you are saving for the first time, the Save As dialog box appears.

2.   Type the name you want to give your query.
3.   Click OK. Access saves the query. You can now access the query by using the Navigation pane.

Read More

Create a Query That Uses Two or More Tables

Leave a Comment
Create a Query That Uses Two or More Tables

If you want to view data from two or more tables or queries, you can create a query that pulls the data from multiple tables or queries. The tables and queries from which you pull your data
  Should have a relationship.
To create a query that uses two or more tables:
1.   Open the tables and/or queries you want to use in Query Design view.
2.   Choose the field names you want to retrieve in the order you want to retrieve them.
3.   Choose the field names you want to sort by in the order you want to sort. Under the fields you want to sort by, choose Ascending or Descending.
4.   Enter your selection criteria, if necessary (Not applicable in this example).
5.   Deselect the Show button for columns you do not want to display (Not applicable in this example).

6.   Click the Run button. Access retrieves the columns you chose and displays the rows in the order you specified.
Read More

Sort Multiple Columns in a Query

Leave a Comment
Sort Multiple Columns in a Query

As you learned in the previous section, you can sort the rows your query returns. You can also create sorts within a sort. For example, you can sort by state and then within a state, you can sort by last name and then by first name. You specify the sort in the order you want the sort to occur. If you want to sort by state and then by last name within a state and then by first name within last name, you enter the sort in the following order: city, last name, first name. Your sort order may not agree with the order in which you want to display fields. In such a case, you can use fields that do not display to enter your sort order. To prevent a field from displaying, deselect the Show box on the Show row.
To sort multiple columns:


1.   Open a table or query in Query Design view.
2.   Choose the field names you want to retrieve in the order you want to retrieve them.
3.   Choose the field names you want to sort by in the order you want to sort.
4.   Under the fields you want to sort by, choose Ascending or Descending.
5.   Deselect the Show button for the columns you do not want to display.
          6.   Click the Run button. Access retrieves the columns you chose and displays the rows in the order                       you specified.
Read More

Sort a Query

Leave a Comment

Sort a Query
When creating a query, you can sort the rows you retrieve in ascending or descending order by choosing the option you want on the Sort row in Query Design view.
To perform a sort:
  • 1.   Open a table or query in Query Design view.
  • 2.   Choose the field names you want to retrieve in the order you want to retrieve them.
  • 3.   Under the field you want to sort, click the down-arrow and then choose Ascending                                    or Descending.
  • 4.   Click the Run button. Access retrieves the columns you chose and displays the rows in the order you specified.


Read More

Retrieve Multiple Columns

Leave a Comment
Retrieve Multiple Columns

You can use an Access query to retrieve multiple columns of data. On the Field line in Query Design view, choose the field name of each field you want to retrieve in the order you want to retrieve them.


To retrieve multiple columns:
 1.   Open a table or query in Query Design view.
2.   Choose the field names you want to retrieve in the order you want to retrieve them.
3.   Click the Run button. Access retrieves the columns you chose.

Read More

Retrieve a Single Column

Leave a Comment
Retrieve a Single Column

You can use an Access query to retrieve a single column of data. Instead of choosing the tablename.* option on the Field line in Query Design view, choose the name of the field you want to retrieve.
To retrieve a single column:
1.   Open a table or query in Query Design view.
2.   Choose the field name you want to display in the field line.

3.   Click the Run button. Access retrieves the column you chose.
Read More

Change from Datasheet View to Query Design View

Leave a Comment
Change from Datasheet View to Query Design View
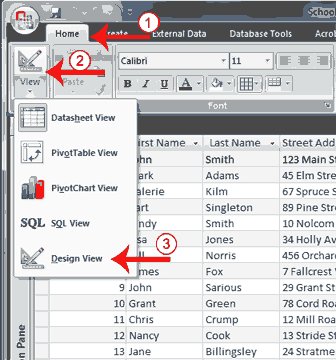
After you run a query, you can easily change back to Query Design view and make modifications to your query or create a new query.

To change to Query Design view:


1.   Activate the Home tab.
2.   Click the down-arrow below View in the Views group. A menu appears.

3.   Click Design View. Access changes to Query Design view. You can modify your query.
Read More

Creating Microsoft Access Queries

Leave a Comment
Creating Microsoft Access Queries
A query can be based on tables or on other queries. To create a query, you open the tables or queries on which you are going to base your query in Query Design view, and then use the options in Design view to create your query. You then click the Run button to display the results. You can save queries for later use.
To open tables or queries in Query Design view:

1.   Activate the Create tab.
2.   Click the Query Design button in the Other group. The Show Table dialog box appears.
3.   Activate the Tables tab if you want to base your query on tables, activate the Queries tab if you
want base your query on queries or activate the Both tab if you want to base your query on both tables and queries.
4.   Click to choose the table or query on which you want to base your query.
5.   Click Add. The table appears in the window.
a.    Click to choose the next table or query on which you want to base your query.
b.   Continue clicking tables or queries until you have all the tables and queries you plan to use.
6.   Click Close. Access changes to Query Design view.

Display All Records and All Fields

In Query Design view, each table has an option that allows you to display all of the fields and all of the records in a table. This option appears on the field line on the drop-down menu as the table name followed by a period and an asterisk (tablename.*).


To display all records and all fields:

1.   Open a table or query in Query Design view.
2.   Click the down-arrow in the first field on the Field row and then select the tablename.* option.
The table name appears on the table line.
3.   Click the Run button. Access retrieves all of the fields and records for the table and displays
them in Datasheet view.


Read More